


Step 1: (Insertion of the 1st clasp leg)


- Take the first leg of the clasp out of the package and fix it with the pliers near the hook.
- Now carefully hook the fixed leg under the nail plate of the side that is not so badly affected.
Proceed:
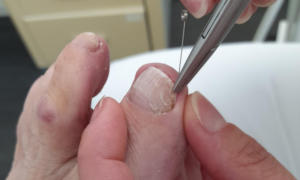

- Check, that the hook corresponds to the nail gauge (thickness) – most securely at the front edge of the nail. If necessary, adjust the hook until it optimally encloses the lateral edge of the nail.
- With the back of the end hook first, the respective leg of the clasp is inserted along the side of the nail – as deep as possible – into the nail fold.

- Once the desired position has been reached, hook the wire under / firmly on the side edge of the nail with a secure twisting movement in the direction of the nail plate.
(End hook encloses the lateral edge of the nail)

- Ask your patient whether the seat of the clasp leg is pain-free when pressure and tension are applied.
Step 2: ( Notch the „V“.)


- Form the hooked wire onto the nail by carefully pulling it over the nail plate.

- Now notch the wire with the Notch plier, close to the lateral edge of the nail where the clasp leg is hooked.

- The „V“ must point to the nail matrix and lie flat on the nail
The „V“ for what?
- ensures a stable support on the nail
- Prevents twisting (corkscrew effect)
- makes the claps leg more elastic and softer
- Forms the basis for traction force
- Forms the connection point to the second leg of the clasp
- Variation with two „Vs“ possible
Step 3: (Set the activation mark)


- Use the pencil to mark the point on the nail plate where the two legs of the clasp should meet
- The marking is usually „halfway“ to the top of the „V“
The variations of the traction force:

- The NORA corrects the nail shape only via elastic spring forces (yellow marking)
- Minimal pretension, the NORA corrects the nail using spring forces and slight tensile forces (green marking)
- Strong traction when the mark is at the beginning of the notch (red mark)
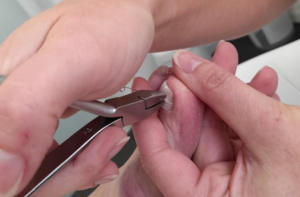
Step 4: (Insertion of the 2nd leg of the clasp) 


- Repeat the same process as described in step 1 with the second leg of the clasp.

- The 2nd leg crosses the marking on the nail plate

- Coming from the outside, the flat-nosed plier gets applied directly in front of the marking

- Now the leg of the clasp is bent vertically upwards by 90° – 120°


- Now the activation can be more precisely adapted to the individual nail situation, which means it can also be reduced.
Step 5: (connection of the two clasp legs) 

- The first leg of the clasp is fixed by hand
- The second leg of the clasp is fixed either by hand or with the pliers
- Tension both legs of the clasp and press down onto the nail plate
- Check whether the position is still correct and whether the patient feels pain


- If everything is in order, the clasp legs can be twisted together by about 180° just above the nail plate
- The point of the “V” tightens around the crease as you twist
Step 6: (remove clasp ends) 

- The hook can be brought very close to the nail plate by bending it down with a twisting movement of the flat-nosed pliers
- To do this, the legs of the clasp are clamped one after the other approx. 4-5 mm behind the hook


- The flat-nosed pliers make a 90° upward turn
- In this movement, the 4 – 5 mm long section of wire is pushed down to the nail plate


- When the NORA sits well, the excess wire sections that are no longer required can be clipped off briefly with the side cutters
- Important! As close to the twist as possible
Sealing of the clasp


- The connection point is sealed with a commercially available, hard-curing polymer acrylate
- The clasp is done!
- The patient should come to you for a check-up after about 2-3 days.
- If everything is fine at this check-up appointment, the patient will present to you at regular intervals of 4-6 weeks.
- As soon as the effect of the Nora brace is no longer sufficient, a new Nora brace is applied.
BRONZE STATUS
• Online training with microphone & camera to interact with the lecturer and a foot model to practice on
• Previous knowledge and practical, regular experience with wire clasp systems
![]()
SILVER STATUS
• On-site training
• für Teilnehmer, die keine oder wenig Erfahrung mit der Orthonyxiebehandlung haben und Teilnehmer, die gerne praktisch lernen.
![]()
GOLD STATUS
• Training of the NORA nail correction trainers
• Day training with final test in Dortmund
![]()